HomeBlog7 tips: professional onboarding in Zoom or Microsoft Teams for the presenter and speakers
7 tips: professional onboarding in Zoom or Microsoft Teams for the presenter and speakers
Content type:
Blog
Published on:
You are organizing an online event in Zoom or MS Teams and want your presenter or host, together with the speakers, to come across well. An onboarding session with everyone involved offers a solution. In this article we explain in seven steps how to make sure everyone is prepared and clearly visible and audible.
You have probably seen it go wrong often enough. Meetings or webinars where the image or sound stuttered because of a poor internet connection. People who could not be seen or heard, or a speaker who could not unmute themselves. As a result, far too many online events have completely fallen apart, and that is a shame. With good preparation, this is easy to prevent.
In the article ‘Organize your Zoom meeting professionally‘ we explain which roles are important within an online event, what you need to pay attention to and which event variants we distinguish.
In the studio, three people are talking to each other. Two are physically present and one is dialing in via Zoom.
Speakers dialing in via Zoom or MS Teams
Suppose you are organizing a fully virtual event in which everyone participates virtually, including the host, the speakers and the audience. Or you are livestreaming from a physical studio but want to give some speakers or table guests the opportunity to join and contribute remotely. Microsoft Teams or Zoom are very suitable for this. You do, however, want to make sure that everyone comes across well.
Useful tips for your host and speakers
If your speakers are dialing in from another location using their own laptop, then the tips in the article ‘At your best on webcam‘ below are useful to know.
It is very important to discuss (and test) the program, the timings and all technical matters with everyone who is part of the broadcast. So everyone who appears on screen and actively takes part in the program, separate from the audience that watches more passively.
This is called an onboarding and ideally you do this well in advance so that there is still enough time to solve any problems. At Valo we prefer to do this two to three weeks before the online event takes place.
What do you test during an onboarding?
For the presenters and all speakers, it is important to know the exact program, including the timings. That way they have a clear picture of what is expected of them and when.
If you dial in via MS Teams or Zoom, the following is important:
A stable and fast internet connection.
A good laptop, computer or smartphone.
The latest version of Zoom or Teams.
Everyone must be clearly audible.
All participants must also be clearly visible.
For a presentation, you must be able to share the screen correctly.
All participants must be able to see and hear each other well.
System preferences for Zoom Meetings & MS Teams
Zoom has extensive documentation on how to get the most out of the software. And for Microsoft Teams you will find the documentation here. We have listed the most important points for you below.
1. The best internet speed for Zoom (or MS Teams)
You want to broadcast in HD video format, at 720p or 1080p HD video resolution. Also check which video format your webcam can handle. On the internet, everything is sent in small data packets. In a video meeting, it is important that these are sent as quickly as possible and that almost all of them also arrive at their destination. If they do not all arrive, you get stuttering in your image and sound.
A fast and stable internet connection is crucial
For Zoom and Teams you should take into account 1.2 Mbps to 3.8 Mbps upload and download speed and a ping of no more than 150 ms. You can easily use 800 MB to 2.5 GB per hour in a group meeting with multiple people dialing in by video.
By the way, 3.8 Mbps stands for ‘megabits per second’ and 150 ms stands for milliseconds. And it indicates the maximum speed for downloading (receiving) and uploading (sending) all video connections in Zoom. The same speeds and data usage also apply to MS Teams.
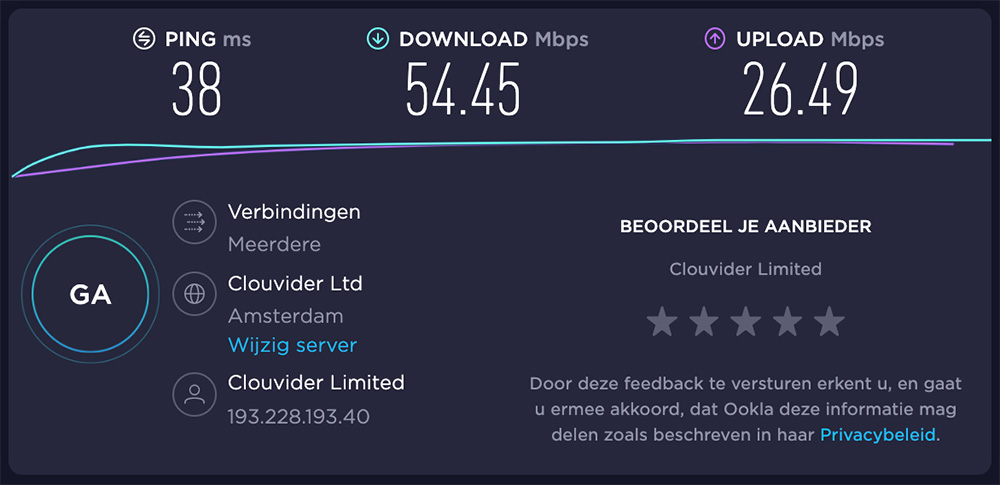
Test your internet speed via Ookla
You can easily test your speed at: Speedtest by Ookla. In the example below you can see a ping of 38 milliseconds, a download speed of a little under 55 Mbps and an upload speed of a solid 25 Mbps. In principle, a perfectly good internet connection for a video call.
Speedtest by Ookla.
ping.canbeuseful.com allows you to monitor your ping over a longer period of time so that you get a good picture of stability. The lower this number, the better the connection.
Do you really only have access to wifi?
Then sit close to the router and make sure as few other people or devices as possible are using that wifi network. If you or others create a lot of data traffic, you will notice this in a lower or unstable speed.
2. What is the best laptop for a video call?
Zoom & MS Teams are heavy programs and therefore ask a lot of your computer. Especially if you are going to share your screen for a presentation or are in a meeting with a large group of video callers. If you want to run Zoom properly, your computer must meet the minimum requirements. Also see the minimum requirements for MS Teams.
Our advice is to always go well above those requirements so that you can be sure your smartphone or laptop can run this software properly alongside other programs as well. Newer, more expensive laptops with a powerful processor can usually handle this software well.
3. Update the software
Zoom & MS Teams are constantly improving their software and adding new functionality. Therefore always update your software to the latest version. Download Zoom here or download MS Teams here.
4. We can’t hear you
‘You’re on mute’ and ‘we can’t hear you’. By now these are familiar sayings. So set this up properly beforehand and test whether it works.
In both Zoom and MS Teams you can select the source of your speaker and microphone in the settings. We often recommend using a headset or earbuds. You can then set those as the ‘source’ for the speaker.
For the microphone we usually simply select the internal microphone of the laptop. This is because the internal microphone on most headsets is not of good quality. So test this and see what works best for you.
If you really want to go for that ‘radio voice’, an external USB microphone can be the solution. The Blue Yeti or Snowball are good USB microphones. You will need to select that as the audio source as well. So check this carefully before going live.
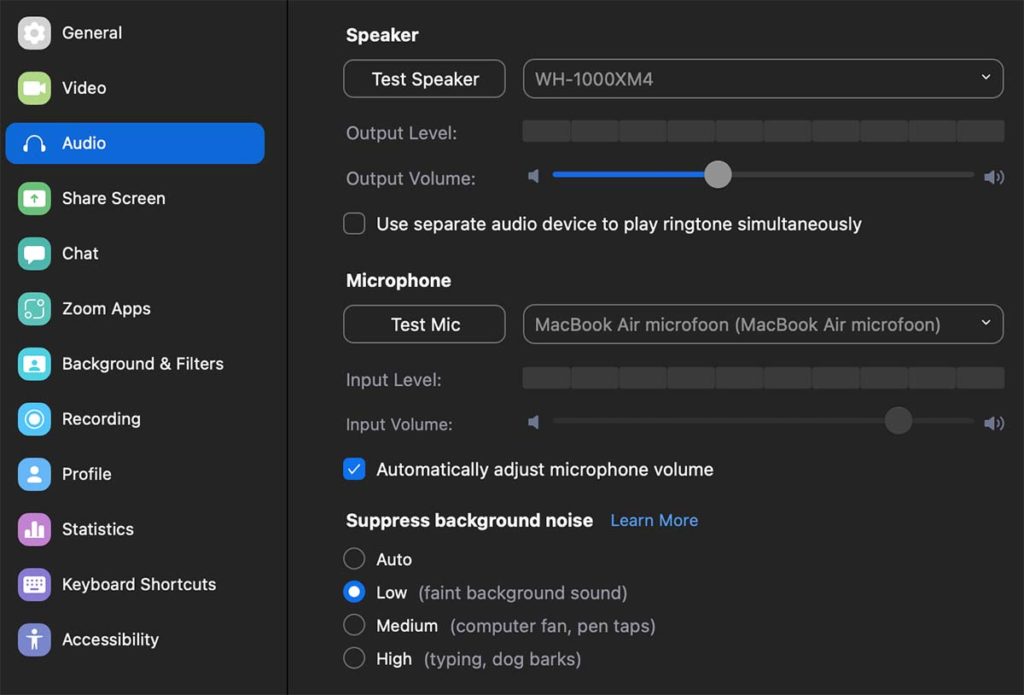
Below you can see the audio options in Zoom. An external Bluetooth headset is selected as the speaker here (WH-1000XM4 in this example). But the internal microphone is selected as the microphone because it gives better audio quality (here the MacBook Air microphone). On your own device, you will see different options.
Audio settings in Zoom.
5. Turn on your webcam
Grainy or dark image. That is of course not what you want. The webcams in newer computers often deliver sufficient quality.
External USB webcam
You can choose to use an external USB webcam. Cheap is often expensive. A more expensive model really gives a better video image and still performs well when it is darker or brighter in the room.
The pricier webcams are often HD and record in 1920 × 1080 pixels (1080p). Cheaper cameras often record in 1280 × 720 pixels (720p). Fewer pixels does not necessarily mean the image is bad. Often the software automatically chooses the laptop’s internal camera. You then have to manually select the USB camera yourself as the video source in the software.
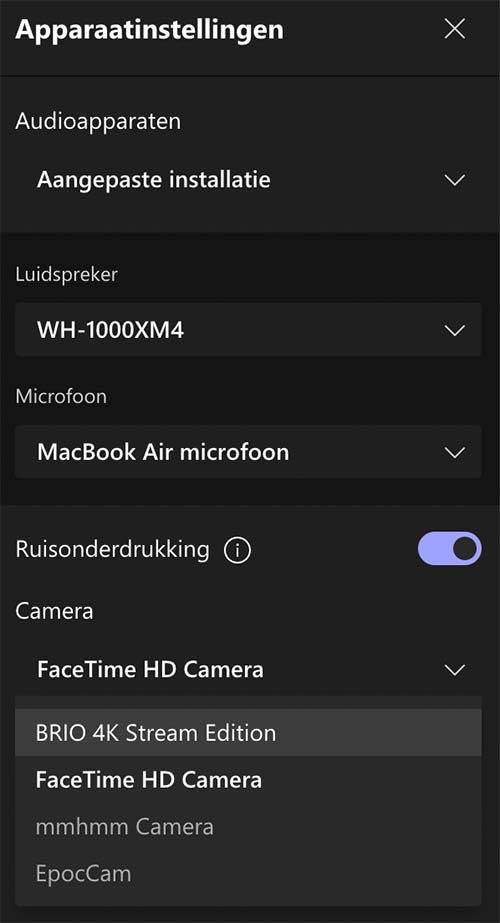
Below you can see the audio and webcam settings in Microsoft Teams. In this example there is a choice between multiple cameras. The FaceTime camera is the internal camera and the BRIO 4K is the external USB camera.
Webcam settings in MS Teams. Here you can see multiple webcams.
Note: the internal microphone of such webcams is often of poor quality. Check this and therefore do not select it as the audio source in Zoom or Teams either.
The Logitech BRIO 4K webcam in action during a video call.
Do I need a 4K webcam?
4K gives a video image of 4096 × 2160 pixels (2160p). Very cool, but both Zoom and MS Teams currently only support HD image: 1080p. So this means you will automatically also broadcast at that resolution with your 4K webcam. So no, you do not need to use a 4K webcam.
But…
What can be useful is that you can often digitally zoom in on the 4K video image. That way you can, for example, center yourself better in the frame. The Logitech BRIO 4K webcam has this option with separate software that you have to install.
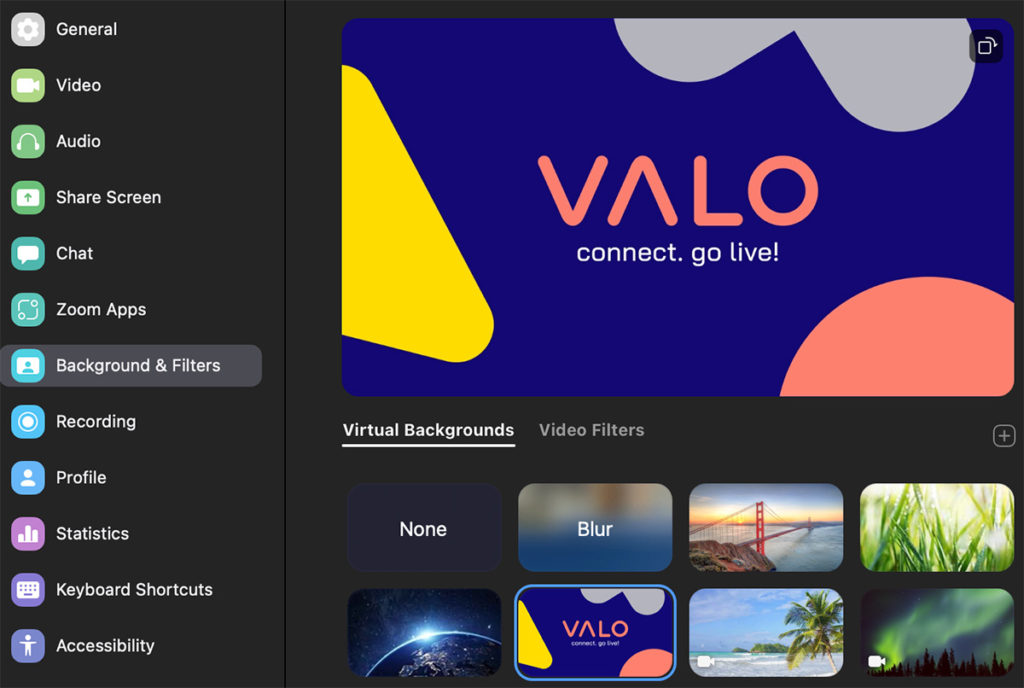
Using filters and digital backgrounds
A filter, digital background or virtually blurring your surroundings is easy and often used. Very handy of course if you are in the bedroom, your bed is not made and you have just hung up your clothes to dry. Still, we are not fans of it because you can often see that it looks fake and ugly. As a result, it can actually be very distracting.
Virtual backgrounds tab in Zoom.
6. Share your presentation
You have gone all out on that presentation and everything looks top notch. Now of course you want to share it with the rest of the world. In Zoom or MS Teams you can share your entire desktop, a specific program or, for example, a tab in your web browser. Usually we choose to just share your entire screen. Do keep in mind that the viewer at home can then, in principle, see everything you do on your desktop. Zoom provides text and explanation about this and for Teams you will find more information in this article.
Aspect ratio in HD widescreen
Most online videos and livestreams are broadcast in widescreen HD video. This has an aspect ratio of 16:9. In the past, televisions and monitors were more square and had an aspect ratio of 4:3. Many presentations are automatically formatted in 4:3. You then get a black bar on the left and right because Zoom and MS Teams broadcast in widescreen (16:9). So it is nicer to format your presentation in HD widescreen.
Aspect ratio 16:9 on the left & 4:3 on the right.
Allow permission to share your screen
Your computer is usually secured so that software such as Zoom or Teams cannot simply ‘broadcast’ everything that happens on your desktop. You need to give this software explicit permission to share your screen. Test this in advance so that you do not face surprises later on.
Turn off notifications
If you share your entire screen, nothing is more annoying than notifications from incoming emails, messages and tomorrow’s weather forecast. Make sure all of that is switched off. Also make sure you do not accidentally have your mailbox open with sensitive emails.
Your presentation contains audio or video with sound
If you have incorporated video or audio into your presentation, it is good to test this thoroughly. Videos that will not play, YouTube links that do not work, unfortunately we have experienced this many times. So check that this works correctly.
In Zoom or Teams you can also tick that you want to include the sound when sharing your screen. If you share your presentation, the audio from your computer is sent along automatically too. Microsoft Teams explains in an extensive article how this works. Read this article to see how it works in Zoom.
Ultra-wide computer monitor.
7. Can you see the others too?
It is of course also important that you can see and hear the others and any presentations properly. A large screen really helps you read even the small print in, for example, a presentation. You can also place two screens next to each other so that, besides Zoom or Teams, you can also open your notes on the other screen.
Can you hear everyone?
Audio from speakers can cause an echo because the audio is then picked up again by your microphone. That gives you an unpleasant echo. In that case, use a headset or earbuds and select them as the speaker source in the software. Note: the microphone on such a headset is usually not very good and you may prefer to use the internal microphone of your laptop. You then have to set that separately.
Extra bonus tips:
Zoom & MS Teams are heavy programs
Your computer may have a hard time running videoconferencing software. Therefore close as many other programs or apps as possible. Also close any downloads or programs that are in the middle of updating.
Use multiple devices
If you use multiple programs at the same time, it can be useful to spread them over multiple devices. Your computer may not be able to handle all those programs, freeze or worse: crash. You can also accidentally click away or close a program yourself, especially when you are using everything at the same time.
Multiple devices are very useful in that case. You can run Zoom or Teams on your computer. If you also use sites such as Sli.do, Kahoot or Mentimeter, for example, it can be handy to run these on another laptop. Always check this with your Zoom manager (or MS Teams manager).
Test, test, test
Test everything – really everything – thoroughly in advance. Go through the agenda carefully and do a dress rehearsal in advance in which everything is simulated. That way you can be sure that everything is technically in order during the online event itself.
Read here how to organize a good online event in Zoom: