HomeBlogSetting up a Zoom meeting: the technical side of Zoom
Setting up a Zoom meeting: the technical side of Zoom
Content type:
Blog
Published on:
You want to organize a meeting or online event in Zoom Meetings. In this article we explain step by step how to configure everything correctly in Zoom and what you need to keep in mind.
We are assuming that you have a paid Zoom Meetings account. We are not covering Zoom Webinars or Zoom Events for now. This blog focuses more on the technical side of Zoom. Would you like more information about how to organize the content of your Zoom meeting properly? Then also read the blog articles below.
Maybe you think, ‘Silly question’. Zoom is primarily video-conferencing software and is perfect for digital meetings in small groups. Especially in larger meetings, where more is at stake, it is important to think carefully in advance about exactly what you want, both in terms of content and visuals, and how much of that is possible in Zoom. Thorough testing in advance is very important here.
> The text continues below the photo.
How does a Zoom meeting work?
Zoom Meetings is an online meeting tool. In an online meeting you come together in a digital space. Think of team meetings with a limited number of participants. Zoom is also suitable for meetings and online events with larger groups of people.
The host creates a meeting and can turn many options on or off in the meeting. Besides video calling, it is possible to chat with each other and also send files. You can share your screen, a program or a tab of your browser. This makes it easy to give a presentation.
Host and co-host
The host can also make other people co-hosts so that you share control of the meeting. That way you can let people in from the waiting room, spotlight them during the meeting so they are forced to be visible to everyone. But you can also mute people, ask them to turn their camera and/or microphone on, or remove them from the meeting.
What is mute or unmute?
Turning your microphone on or off. If you click ‘Mute‘, you turn off your microphone and a red line appears through the mic icon. If you then click ‘Unmute‘ again, your microphone turns back on and everyone can hear you. The red line on the icon disappears as well.
Example: muting or unmuting yourself in Zoom.
Breakout rooms
In addition to the general meeting, you can split into different groups in breakout rooms. Very useful for going deeper into a topic with smaller groups or for holding one-on-one conversations.
With a (temporary) upgrade you can receive more people
If your organization uses Zoom as a meeting tool, all employees can usually create meetings to meet. With the Pro plan you can invite up to 100 people, including people outside your organization. With a (temporary) upgrade you can invite more people to the meeting at an additional cost.
Use the Zoom software
Zoom works best when you use the Zoom software or app. You can also use Zoom in your internet browser, but then you miss many features. Zoom continuously improves its software, which is why it is important that everyone always has the latest version of Zoom. You can download Zoom here.
Create a Zoom meeting
Create your Zoom meeting well in advance. We usually do this three to four weeks beforehand so that everyone is aware of the event.
Create an agenda and run of show
Okay, some content tips after all. Make an agenda with a clear run of show down to the minute. This is especially important when there are many dial-in participants and speakers and a lot happens in a short time. Also read about the different roles in a video meeting. We recommend appointing a Zoom manager anyway, who is technically responsible for all settings in Zoom and actively monitors them during the meeting.
Ask yourself, among other things: what are we going to see or hear, exactly when, and who is responsible for it? Who do we see when? Is a presentation or screen being shared, and if so: by whom and at what time?
Configure Zoom
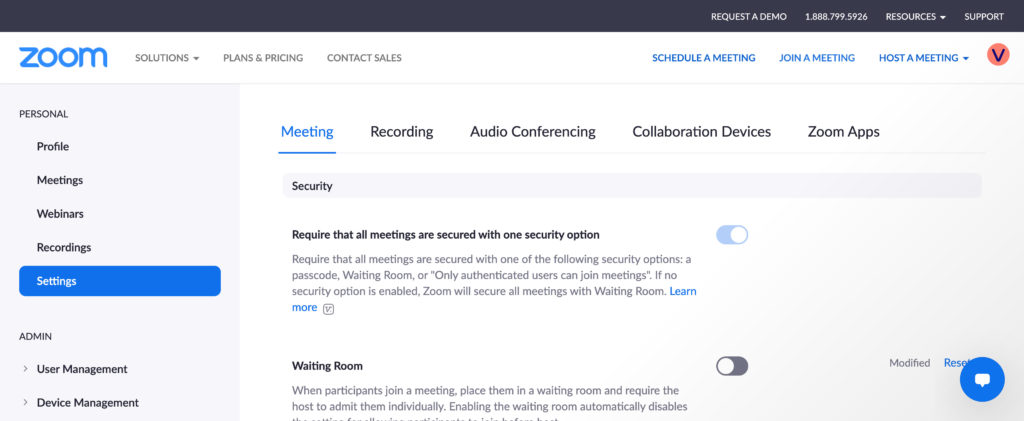
Go to zoom.us, log in and go to the ‘Settings’ tab on the left. Go through everything there and check whether everything is set up correctly for you.
Example: log in to Zoom and go to the settings.
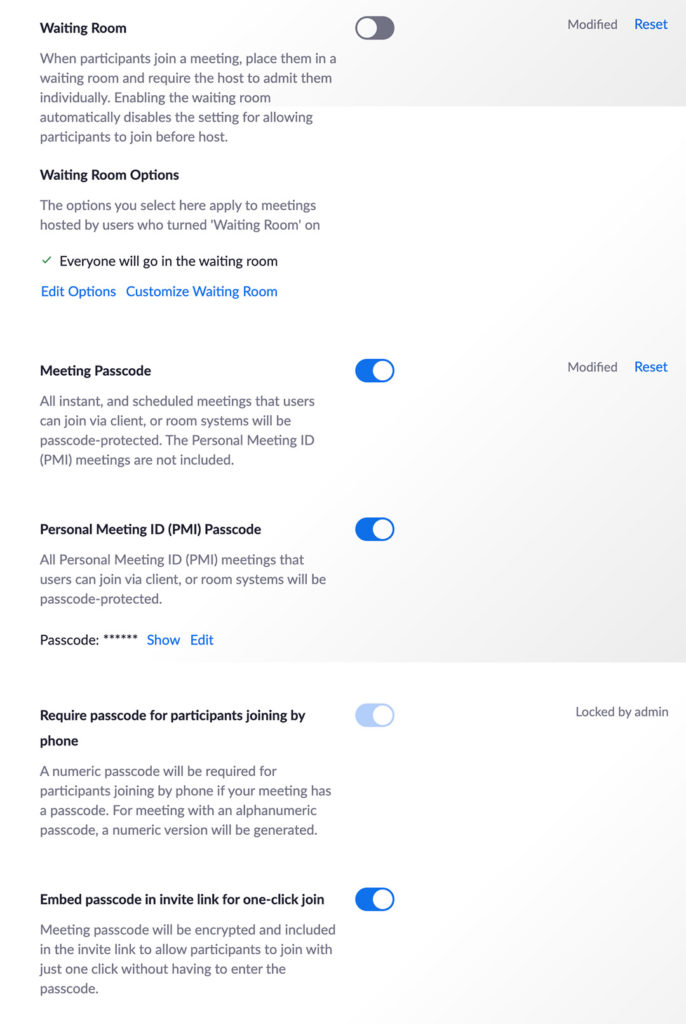
Waiting room or passcode
Do you want people to enter a waiting room first and have the host let them into the meeting afterwards? Or do you want them to be able to join themselves with a passcode?
Example: waiting room and passcode settings in Zoom.
One-click join
At Valo we often organize larger meetings in Zoom where we share the Zoom link with the passcode embedded in it. That way people enter the Zoom meeting automatically without first having to wait. But this is a choice you need to think through carefully. In Zoom, this option is called: ‘Embed passcode in invite link for one-click join‘.
Example: one-click join in Zoom.
Can everyone participate?
Can everyone participate, including people who are not registered with Zoom? That is an option that makes your meeting very accessible for people to join. You can also choose to let only people with a (free) Zoom account join. This option is called: ‘Only authenticated users can join meetings‘.
You can also block people with a specific domain in their email address or from a specific country or region. We leave this turned off by default for our events.
Example: who is and is not allowed to join your Zoom meeting?
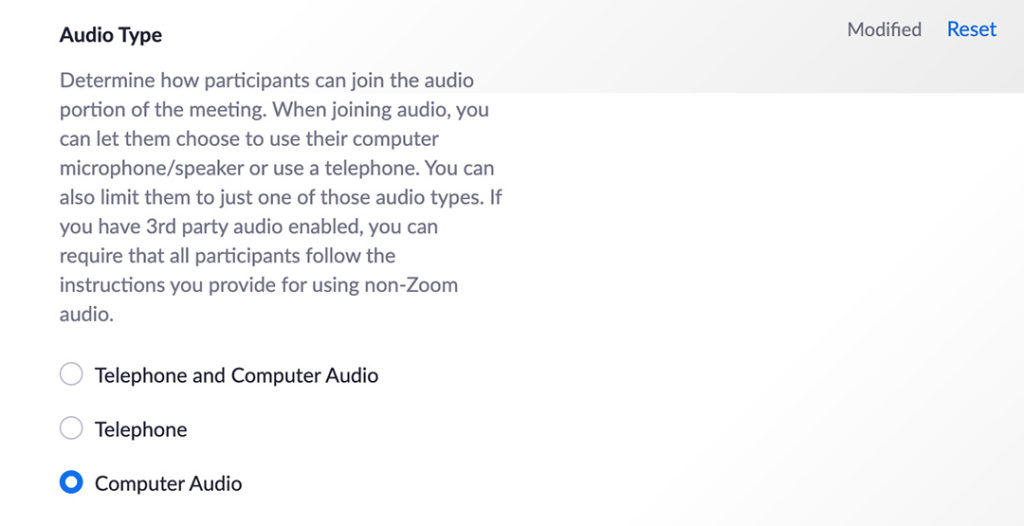
Audio type
Should people only dial in via the computer (with video and sound), or should they also be able to dial in by phone? If it is important that everyone is visible, we choose to dial in via ‘Computer Audio‘ and not by phone.
Example: people can only join with computer audio in Zoom.
Can people join earlier?
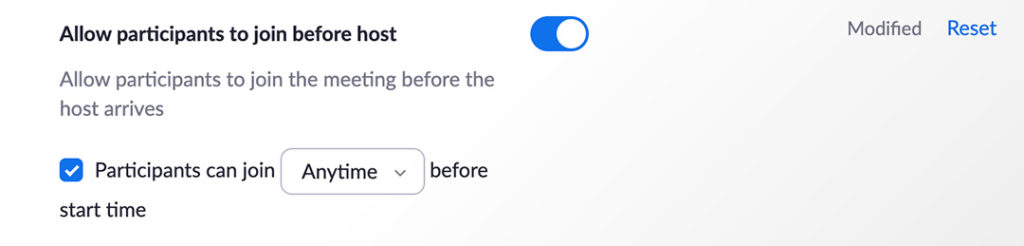
If you have not enabled a waiting room, people can enter immediately with the passcode. You can also choose to let people enter the meeting in advance. For larger events we set a meeting to be ‘recurring‘, meaning it does not have a fixed start or end time. With the option: ‘Allow participants to join before host‘ you give participants full freedom to log in and check whether everything works for them. So it is a personal choice whether you want this or not.
Example: participants can decide for themselves when they join the meeting.
Mute everyone by default
The option: ‘Mute all participants when they join a meeting‘ is always turned on for us. This means everyone’s microphone is off by default when they enter the meeting. People can then unmute themselves and start speaking.
Example: everyone is muted by default in Zoom.
You can also, once you have started the meeting in the Zoom software, choose to force everyone to be muted. In that case only the host can ask someone to turn on their microphone.
If you go to the participant icon in the software, the panel with all participants opens. At the bottom you can click ‘more’ and then you will see the options below. ‘Mute All Upon Entry‘ is checked and under ‘Allow Participants to‘ the option ‘Unmute Themselves‘ is unchecked. This means that only the host or co-host may ask participants to turn on their microphone.
Example: people are forcibly muted in Zoom.
Option to unmute people as host
The option: ‘Request permission to unmute‘ is a little hidden in Zoom’s settings. At Valo we usually turn this option on, but do think carefully about it. Participants are asked in advance whether they agree that the host or co-host in Zoom may unmute them.
Example: the host may unmute participants in Zoom.
Normally the host can ask a participant to unmute themselves, but in this case it happens directly if the host wants it. That is only possible if the participant has given permission in advance.
For larger meetings it can be useful if the Zoom manager has this ability, so the right speakers can be made audible quickly and we do not have to wait until someone unmutes themselves. This way, as the organizer, you keep full control over the meeting or online event.
The chat
Decide in advance who is responsible for the chat as moderator and how questions get to the right people. In Zoom’s settings it is also important to make choices regarding the chat. For example, who can download the chat? We always have the option: ‘Auto saving chats‘ turned on. And should people be able to chat with each other?
Example: chat options in Zoom.
Watch out for the spread of viruses and malware
We leave ‘Send files via meeting chat‘ turned off by default. In large meetings with external participants there is a chance that unwanted files or viruses could be sent.
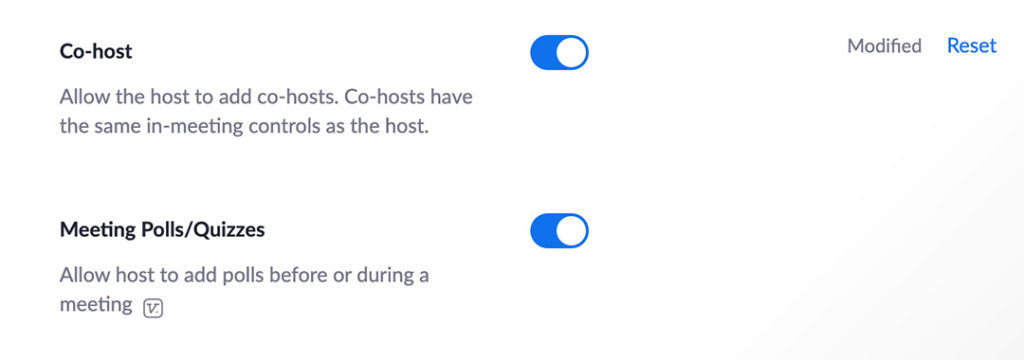
Co-host & polls
Two options directly underneath each other that we always keep turned on. That way you can assign co-hosts and organize polls and quizzes.
Example: select co-hosts and create polls and quizzes in Zoom.
Screen sharing
Think carefully about whether only the host may share screen or whether the other participants may also do so. We usually make the speakers co-hosts and only they can share their screen for a presentation. Think this through in advance.
Example: who may share the screen in Zoom?
Participants may change their name
Many participants have a Zoom account with a strange name that they never change. We have seen the strangest names pass by. That is why we always keep the option: ‘Allow participants to rename themselves‘ turned on by default.
In the Zoom software, people can click the participant icon. Then they see the list of participants. At the top they can search for themselves and to the right of their name there is a blue button with ‘More‘. Click that and then click ‘Rename‘. They can now rename themselves. For large meetings this is a handy option.
As host you can also check this yourself in the Zoom software by going to the participants tab and clicking ‘More’ at the bottom. In this example you can see that the ‘Allow Participant to‘ option has ‘Rename‘ enabled.
Example: let people adjust their own name in Zoom.
Breakout rooms
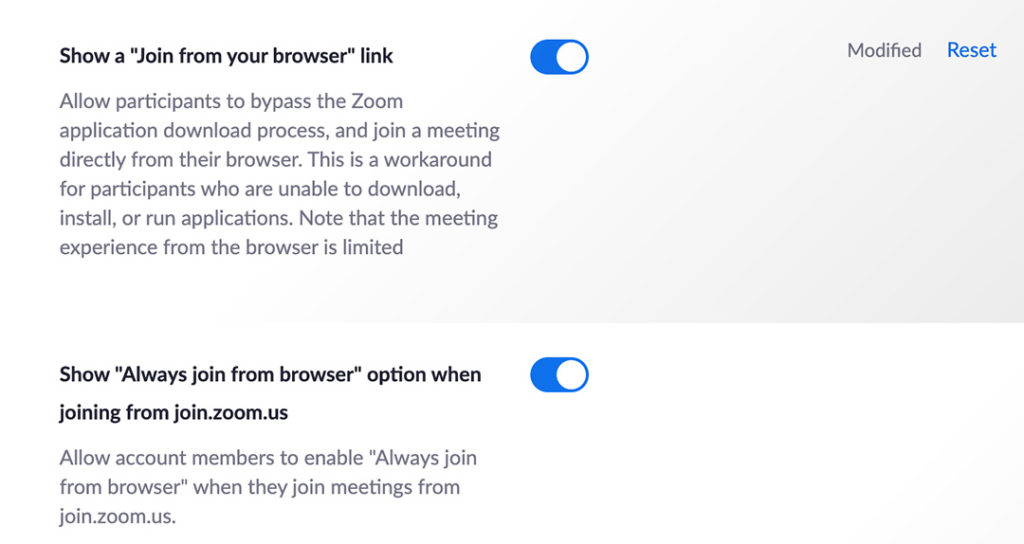
Let people join via the browser
We already mentioned that Zoom works best with the Zoom software. Zoom’s web client misses some functionality. But the option to join via the browser makes it very accessible, and we actually always keep it enabled.
Example: people can also join via Zoom’s web client.
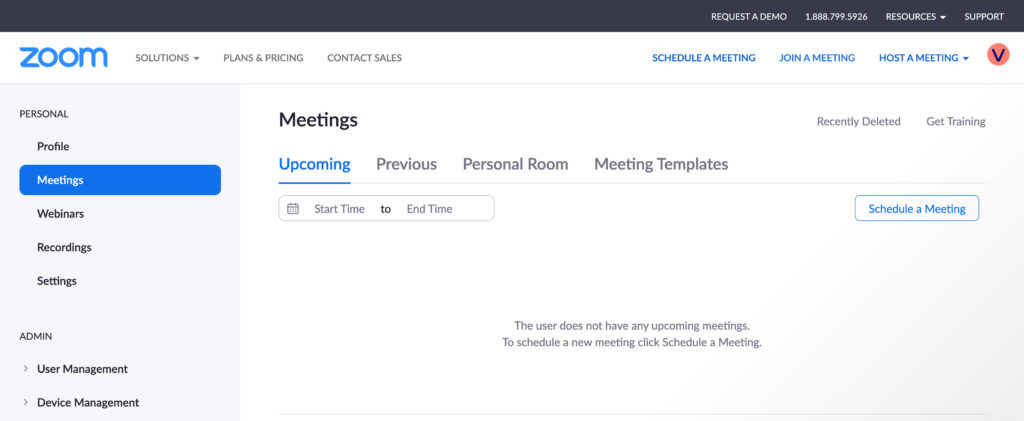
Create a Zoom link
You have gone through all the settings and adjusted them where needed for your situation. Then it is time to create your meeting link in Zoom. On the left, go to the ‘Meetings’ tab. Then click ‘Schedule a Meeting’ on the right.
Schedule a Meeting
In the ‘Topic‘ field you enter the title of the meeting. Underneath, in ‘Description‘, you can optionally add additional information.
Recurring meeting
In this example, ‘Recurring meeting‘ is checked. This means that no start or end time has been set for the meeting. As a result, you can use the same Zoom link indefinitely.
This can be useful if you want to meet more often and do not want to keep sharing a new link. And you can test things to your heart’s content in advance without the meeting ID (the Zoom link) expiring after you end the meeting. Very handy for your online event.
Waiting room
The waiting room is disabled in our example. People can enter with a passcode. You can choose to send a special link in which this passcode is already embedded. People then enter directly through the link and do not have to enter the passcode manually.
Allow participants to join anytime
In the example above you can see that ‘Allow participants to join anytime‘ is checked. If you previously enabled the setting that allows participants to enter the meeting before the host, they can now join at any time they want and test in advance whether everything works for them.
Example: participants can decide for themselves when they join the meeting.
Computer audio
For audio we usually select ‘computer audio’. That way participants can only join from a computer, tablet or smartphone with their microphone and camera. If someone dials in by phone, you only hear the audio and see a phone icon. For an ordinary meeting that is fine, but not for an important speaker with a presentation.
Mute participants upon entry
This option is also always turned on for us. Participants are muted automatically when they enter, and of course they can unmute themselves if they want to.
As host, in the Zoom software at the start of the meeting you can also force people to stay muted. You do this by unchecking the option ‘Unmute Themselves‘. People can then not unmute themselves, which is useful if you have a few speakers and dozens of viewers who may only ask questions via the chat.
Example: people are forcibly muted in Zoom.
Request permission to unmute participants
We usually enable this option, but think carefully about it. Participants can give permission in advance for you as host or co-host to unmute them. For privacy reasons, you may decide not to enable this, or the participant may still choose whether or not to allow it. It can, however, be very useful because it lets you as host keep full control over who can and cannot be heard during a meeting.
Automatically record meeting
You can choose whether or not to record your meeting in Zoom. This can be done either in Zoom cloud or locally on your computer. Participants see a message when they enter that the meeting is being recorded. During the meeting you also see ‘Recording‘ with a red light next to it.
Save your meeting
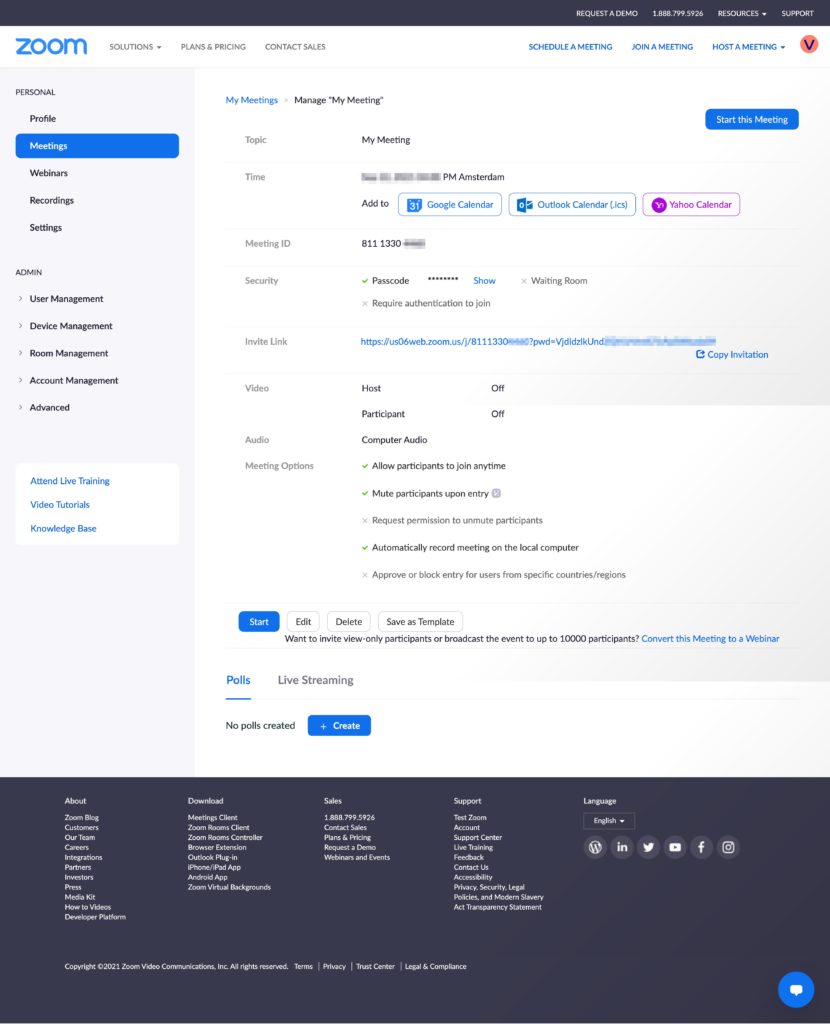
Click the blue save button at the bottom and you have just created your Zoom meeting and will see the screen below.
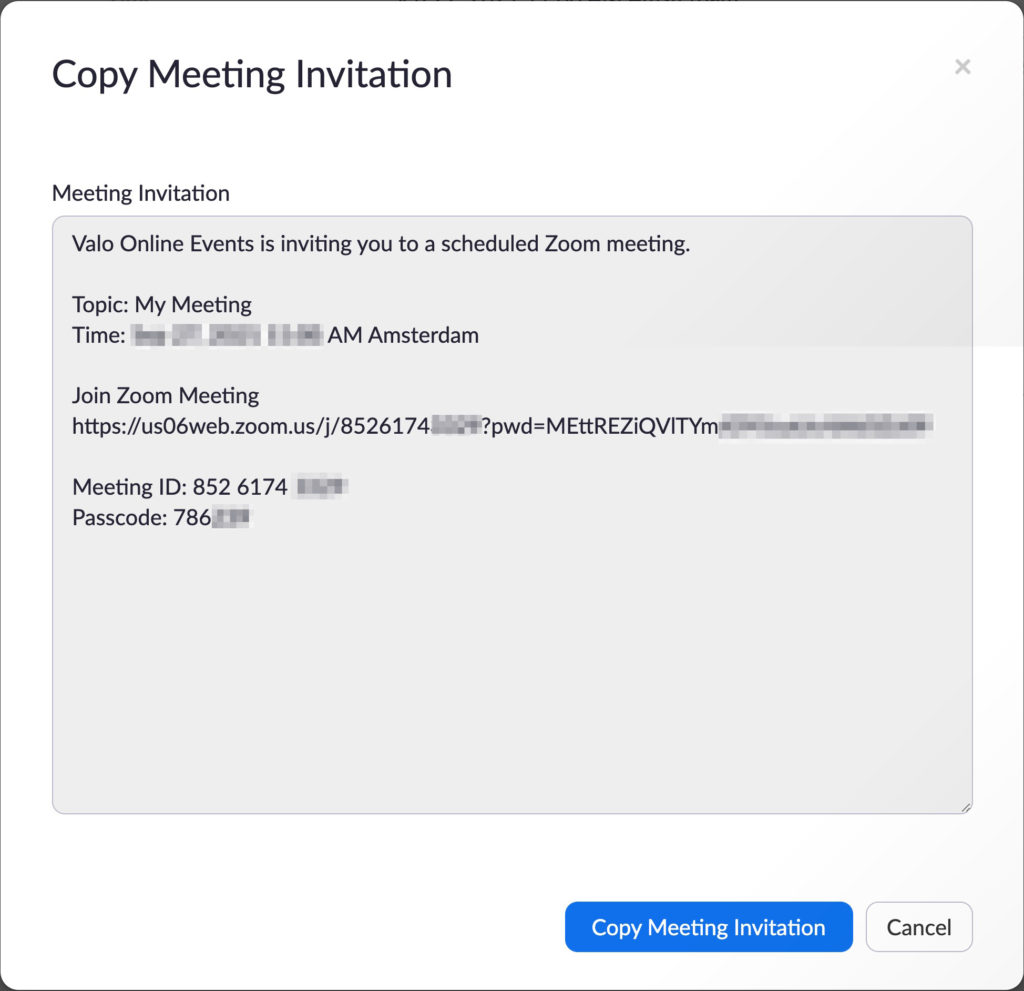
Copy meeting invitation
If you click the long ‘Invite Link‘, you will see the popup below. You can copy this text to invite people to the meeting. You see “(…)?pwd=(…)” in the link: this means that the ‘Passcode‘ is sent automatically, so people do not have to enter it themselves. You set this up earlier under ‘Settings‘.
Test your Zoom meeting
At Valo we use the three T’s: test, test and test again. Testing is perhaps the most important part. Really test every possible scenario and make sure that everything truly works the way you imagined it.
For example, be careful not to accidentally test the meeting and then end it prematurely by pressing the red ‘end meeting’ button. That is why we often set a meeting to ‘recurring’ so that you can start the same meeting endlessly and test in it whenever you want. In addition, we usually create an extra test meeting with a different access link in which we can test all settings to our heart’s content without affecting the actual meeting.
Test everything. For example, check how many meetings you can run simultaneously within your account. And bear in mind that you do not have the same rights as a (co-)host in a breakout room as you do in a normal meeting.
Presenting in a Zoom meeting
Within the Zoom meeting, you, a co-host or other participants (if you have configured that) can present something in the meeting. For example, that PowerPoint presentation you have been working on night after night. Zoom has many options for sharing your screen and files. Here we only cover a few basic options.
When you are in the Zoom app, you will see a green ‘Share Screen’ button at the bottom. If you press it, a new screen opens. You can choose to share your entire screen or, for example, a specific tab in the Google Chrome browser if you have it installed. Keep in mind that if you share your entire screen, people can see everything that happens on your desktop. We have all experienced this at some point: private emails were open or constant pop-ups appeared from all kinds of apps. Be aware of this and turn all of that off.
Sharing audio and/or video
When you share your screen, you will see two options at the bottom of the window: ‘Share sound’ and ‘Optimize for video clip’. If you want to share audio, it is important to check this box. If you are showing a video, it is a good idea to also check the second option. Note that this does require more internet bandwidth and processing power from your computer. If you do not need it, do not check it.
Create Zoom breakout rooms
You can create breakout rooms in your meeting in advance. Do this in the browser by going to your meeting and clicking ‘Breakout Room pre-assign’ at the bottom. You can click ‘Create rooms’ here. You can also assign people to rooms in advance here. However, from experience we know that this pre-assign function is very unreliable. So be careful with it and test it in advance.
You can also create breakout rooms after you have started your meeting in the Zoom app itself. In the app, click the ‘Breakout room’ button at the bottom and a new screen opens. Here you can create a new room or open an existing room. You can also add participants to a room here by clicking ‘Assign’ next to the relevant breakout room.
In this same window you will see a gear icon at the bottom left. If you click it, you will see more options for the breakout rooms. For example, you can choose to let everyone pick a room themselves (‘Allow participants to choose room’). That can be very useful because it can take some of the pressure off you as the organizer during the meeting.
You can also choose to let people return to the main session themselves (‘Allow participants to return to the main session at any time’). And you can choose to close all breakout rooms automatically after a certain amount of time. We prefer to keep control ourselves and close all breakout rooms manually, so there is room to catch up with the program or to continue longer if needed.
Start Zoom breakout rooms
You have created the breakout rooms. Click the ‘Breakout room’ button in the Zoom app and a new screen opens. Here all your rooms are listed underneath each other and in the bottom right you will see a blue ‘Open All Rooms’ button. Clicking this starts all rooms simultaneously. You can then send a general message to all rooms. Very handy if you want to close the rooms in a few minutes. Finally, close the rooms by pressing the red ‘Close All Rooms’ button (Zoom will then ask for confirmation). This automatically brings everyone back to the plenary main meeting.
Start the Zoom meeting
You have created and tested your meeting. You can start your meeting by going in the browser to ‘Personal’ > ‘Meetings’ and then pressing the blue ‘Start’ under your meeting. The Zoom app then opens and you are in your meeting. Because you have set everything up correctly and tested it thoroughly, you can start your meeting with peace of mind.
At the end of the meeting, you can press the red ‘End’ button in the Zoom app and then click ‘End meeting for all’. You will then have closed your meeting correctly for everyone.